A cocktail menu that guests cannot scan costs time on every order, because the bar ends up explaining drinks instead of making them. Design it in five passes: set how many drinks the bar can make well, group them the way guests choose, write every entry to one pattern, lay out the page for dim light, then test it in service.
A good cocktail menu is a short, grouped list where every entry tells the guest what is in the glass. Decide the length from what your bar team can make consistently at peak, not from how many ideas you have. Group drinks by style, by flavour or by strength; the International Bartenders Association, for example, sorts its official list into three groups. Under each name, give the base spirit and two or three key ingredients. Set the text so it stays readable in the bar’s own light: the W3C’s web contrast guideline of at least 4.5:1 for normal text is a useful reference. Then trial the menu for a few weeks before you print a large run.
This guide is for independent restaurant and bar operators who build their own drinks list, with or without a template tool. It covers structure, entry writing and layout. It does not give recipes, and it treats pricing only as far as the menu shows it.
| Input or item | Typical value or source | Why it matters |
|---|---|---|
| Length of the list | What the bar can make consistently at your busiest hour (your own trial) | A list the team cannot execute slows service |
| Grouping | By style, flavour or strength; IBA uses three groups for its official list | Guests find a drink without reading every line |
| Entry pattern | Name, base spirit, two or three key ingredients, price | Guests can decode a name they do not know |
| Low- and no-alcohol drinks | Own heading, same entry pattern | Every guest has something to order |
| Price format | Numerals in one consistent style (our layout advice); a 2009 Cornell study at one restaurant’s lunch service saw higher checks with numeral-only prices | Prices read the same on every line |
| Text contrast | At least 4.5:1, or 3:1 for large text (WCAG 2.2, written for web content) | Menus are read in low light |
| Paper size | Standard US sizes, e.g. letter 8.5 × 11 in or half-letter 5.5 × 8.5 in | Sets how much fits at a readable size |
| Calorie disclosure | FDA menu labeling: chains of 20 or more locations under the same name with substantially the same menu items | Check the FDA’s covered-establishment conditions |
What makes a cocktail menu easy to order from?
A guest can order from a menu when three things are true: the list is short enough to scan, drinks are grouped in a way the guest recognises, and each entry says what the drink is. Design and artwork come after those three. The five steps below take you there in order, because each step depends on the one before.
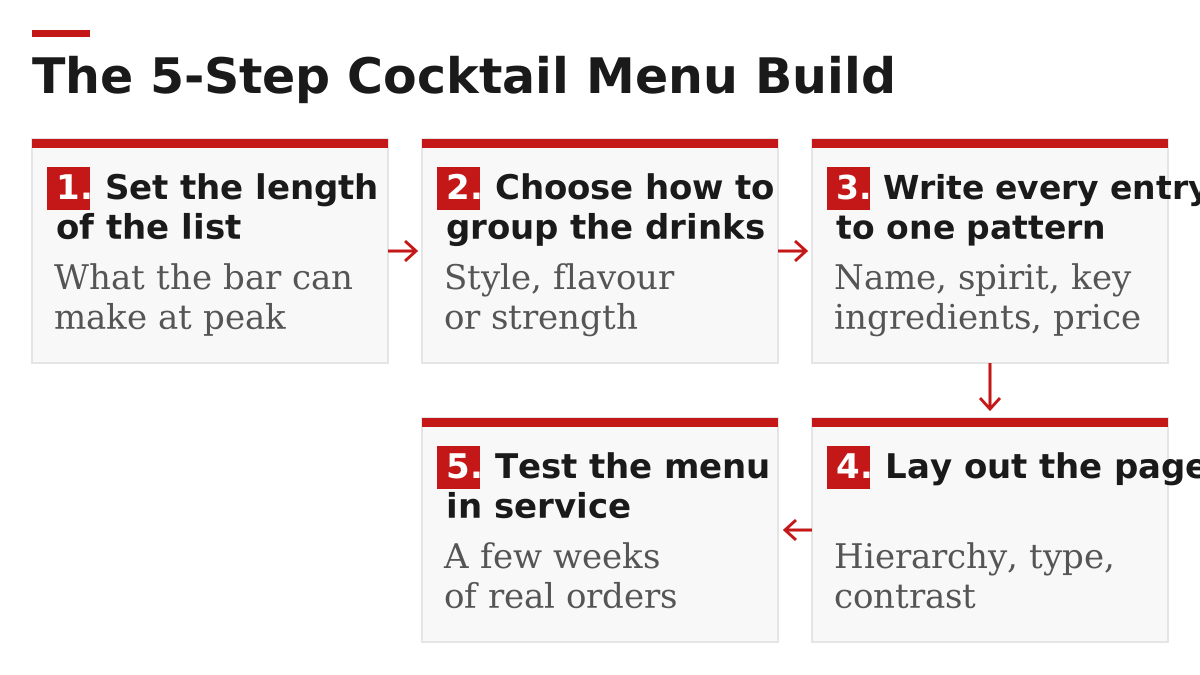
Bar professionals quoted by SevenFifty Daily in 2017 made the same point from the guest’s side. “A menu that details nothing more than an ingredient list can be frustrating, as it gives one little clue of what to expect,” one beverage manager said; guests want to know whether a drink is a highball or a martini-style drink, and whether it is bright or serious. The steps below build that information into the menu itself. This guide is filed under menu planning, where related menu topics are collected. Once the list is settled, counting the stock behind it is covered in the guide to bar inventory software and scales.
Takeaway: Fix the list, the groups and the entry pattern before anyone opens a design tool.
Step 1 — Set the length of the list
Set the number of drinks by what your bar team can make consistently at the busiest hour, not by how many recipes you have. There is no standard count; the right length depends on staff, station layout and how many drinks share prepared ingredients.
Two reported cases show the trade-off. SevenFifty Daily described how one San Diego bar, Polite Provisions, trialled drinks by putting five or six on the menu for a few weeks, watching how guests responded, then keeping or cutting each one. It also reported that Ticonderoga Club in Atlanta opened with a 28-page journal-style list and later slimmed it down “to simplify things behind the bar and for servers”. A long list is not wrong, but every extra drink is another set of ingredients to prep and another line to read.
A practical way to decide:
- List every drink you want to offer and the prepared ingredients each needs (syrups, juices, infusions).
- Mark the drinks that share prepared ingredients; they cost less prep time per drink.
- Run a timed practice round for the drinks you expect to sell most, during a busy-hour simulation.
- Keep the number the team made consistently; hold the rest for a later seasonal change.
As you settle the list, map each drink’s ingredients to your stock records and note any new bottles or prepared items it adds; shared ingredients add nothing new. The bar inventory software guide explains how bars count that stock.
Takeaway: Choose the length the team can execute at peak; keep extra ideas for the next menu change.
Step 2 — Choose how to group the drinks
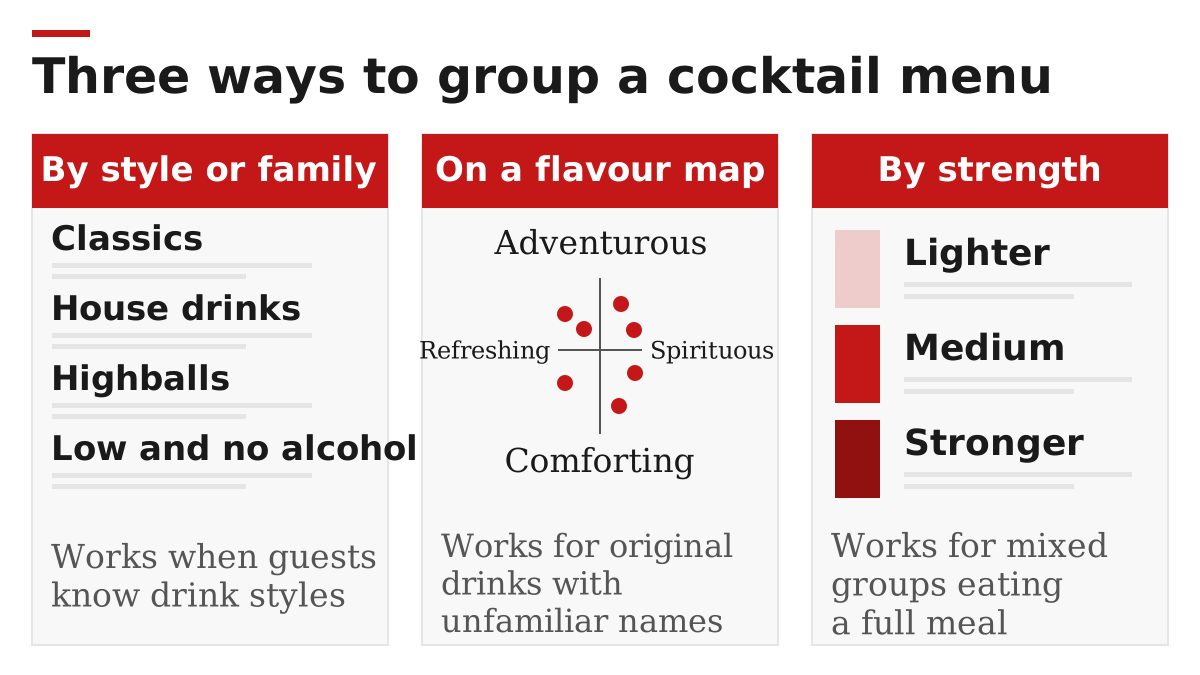
Group drinks the way guests decide: by style, by flavour, or by strength. Our advice is to pick one main grouping for the headings and use the others as consistent secondary marks, such as a strength cue on each entry.
| Grouping | What the guest sees | Works well when | Watch out for |
|---|---|---|---|
| Style or family | Headings such as classics, house drinks, highballs, low and no alcohol | Guests already know drink styles; mixed list of classics and originals | Unfamiliar style names need a one-line explanation |
| Flavour map | Drinks placed on two axes, e.g. “refreshing” to “spirituous” and “adventurous” to “comforting” | A list of original drinks with unfamiliar names | Takes more space; needs careful layout to stay readable |
| Strength | Drinks ordered from lighter to stronger, or marked on a scale | Guests eating a full meal; mixed groups with different preferences | Strength alone says nothing about flavour, so keep the ingredients line |
The flavour-map example comes from Pouring Ribbons in New York, which SevenFifty Daily described charting its drinks on exactly those two axes. The same article reported that Federal Grille plotted its drinks by alcoholic strength and by style, “from classic to adventurous”, and that its beverage manager valued the strength scale because it lets guests enjoy a full meal “without feeling too woozy”. For naming the classic section, the International Bartenders Association offers one model: its official list is grouped as The Unforgettables, Contemporary Classics and New Era drinks.
Give low- and no-alcohol drinks their own heading, written to the same entry pattern as the rest, rather than a single line at the bottom. Guests who are not drinking alcohol then choose from a real section, and staff can point to it.
Common mistake: Grouping by base spirit only. Guests who do not know whether they want gin or rum learn nothing from the heading; add style or flavour cues inside each group.
Takeaway: Pick one grouping that matches how your guests choose, and give low- and no-alcohol drinks a full section.
Step 3 — Write every entry to one pattern
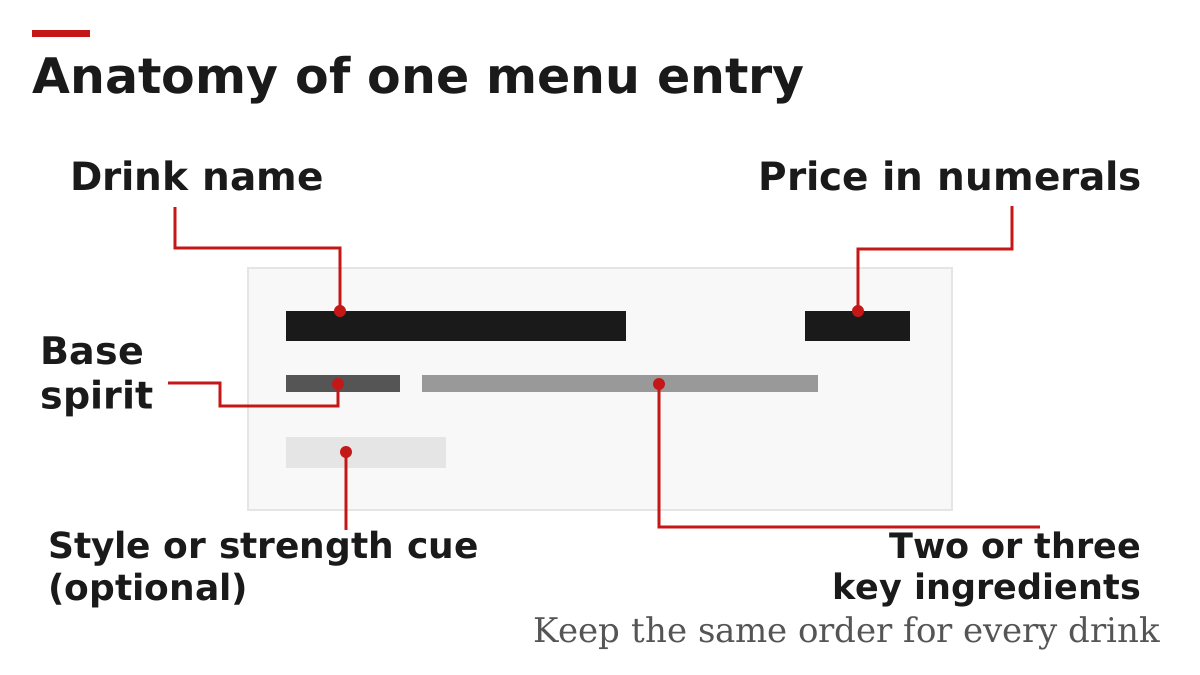
Every entry should follow the same order: drink name, then the base spirit and two or three key ingredients, then the price. A fixed pattern lets guests compare drinks at a glance and keeps the menu consistent when you change drinks later.
| Part of the entry | What to write | Why |
|---|---|---|
| Drink name | The house name or the classic name | Guests use it to order |
| Base spirit | The main spirit, or “no alcohol” | The first thing many guests filter on |
| Key ingredients | Two or three that define the flavour | Tells the guest what to expect |
| Style or strength cue (optional) | “Highball”, “stirred”, “lighter” or a mark on your strength scale | Answers “is it long or short, light or strong?” |
| Price | Numerals, same format on every line | Comparable at a glance |
Write ingredients in plain words a guest recognises; save house techniques for staff training notes. SevenFifty Daily reported that Polite Provisions’ illustrated list “does away with complicated descriptions and details about techniques” behind the bar. If a drink contains a common allergen such as nuts or egg, say so in the entry and follow your local rules on allergen information.
On prices, a Cornell University study published in 2009 compared three price formats on a lunch menu at one restaurant: numerals with a dollar sign, numerals alone, and prices written in words. Guests given numeral-only prices spent significantly more than the other two groups. The authors cautioned that the result might apply only to lunch at that restaurant, and concluded that operational factors such as party size, dining duration and table location had a much larger effect than price typography. Keeping one clean price format is our layout advice; the study is a dated observation from one restaurant, not proof that a format raises sales. The price itself starts from what each drink costs you, which depends on current bottle costs from your stock counts.
Common mistake: Letting a clever name stand alone. If the guest has to ask what a drink is, the entry is not finished.
Takeaway: Use one entry pattern for every drink and keep ingredients in plain language.
Step 4 — Lay out the page
Lay out the page so the eye finds the section headings first, then the drink names, then the details. Use size, weight and spacing to set that order, and check the text is readable in the bar’s own light before you print.
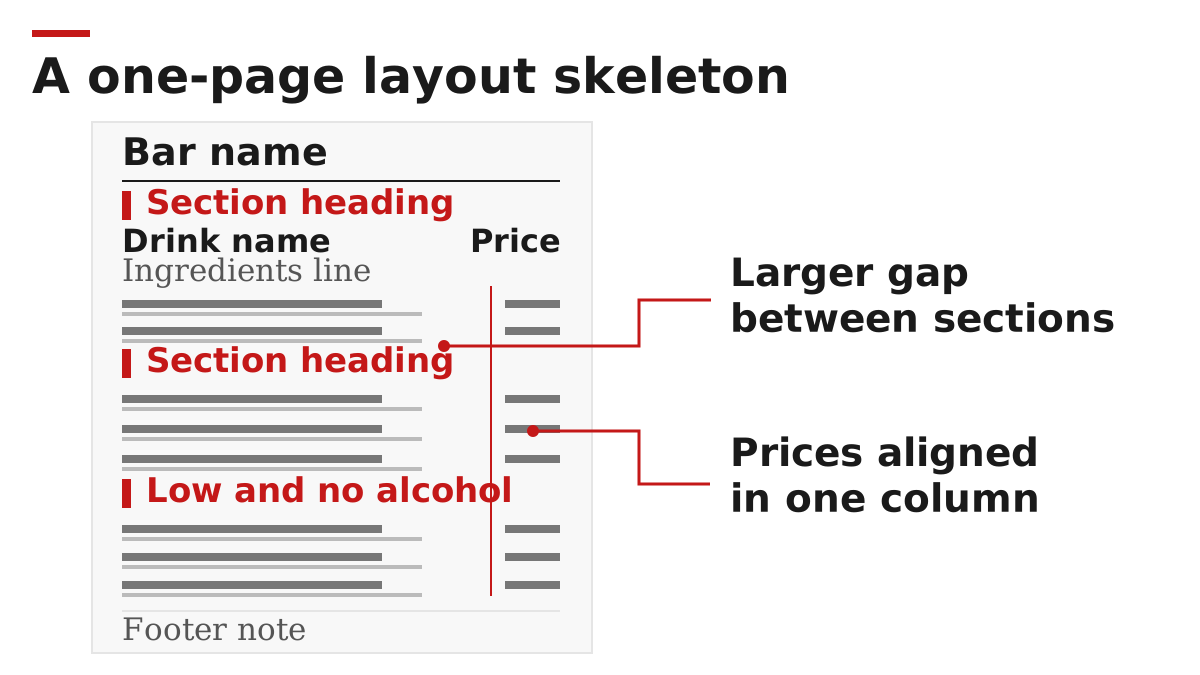
| Check | What to look for | Reference |
|---|---|---|
| Hierarchy | Section headings largest, drink names next, ingredients smallest | Your own proof at full size |
| Type | A plain text face for names, ingredients and prices; decorative lettering only for headings | Print proof under bar lighting |
| Contrast | Dark text on a light ground, or the reverse, with strong contrast | WCAG 2.2: at least 4.5:1, or 3:1 for text of 18 pt or 14 pt bold |
| Price position | Same place on every line, numerals in one format | Keeps prices comparable |
| White space | Gaps between sections larger than gaps between entries | Lets groups read as groups |
| Paper and format | Letter, half-letter, folded card or board, sized to the table | Standard US paper sizes |
| Online and QR menus | The same structure as the printed menu, as live text rather than a photo | WCAG applies directly to web pages |
The W3C contrast guideline was written for web content, so for a printed card it is a reference point rather than a rule; for an online or QR-code menu it applies directly. Checking contrast in a free online contrast checker before you print takes a few minutes. Design-led menus also carry design and printing costs every time the list changes, as SevenFifty Daily’s report noted. If you also list drinks on a delivery app, keep the app menu to the same entry pattern; how delivery apps charge restaurants explains the pricing rules that apply there. A plain, well-structured layout is a sound place to start.
Takeaway: Proof the menu at full size, in the bar’s evening light, before ordering a print run.
Step 5 — Test the menu in service
Run the new menu for a few weeks and record what happens at the bar and at the table, then adjust before you print in volume. A short trial shows which drinks slow service, which entries confuse guests and which sections nobody reads.
| Record during the trial | What it tells you |
|---|---|
| Questions guests ask about each drink | Which entries need clearer ingredients or a style cue |
| Drinks that slow the bar at peak | Candidates to simplify, batch or cut |
| Drinks that rarely sell | Candidates to replace at the next change |
| Sales by section | Whether the grouping matches how guests choose |
| Staff feedback on the order of the list | Whether the layout matches the station workflow |
| Wear and stains on printed copies | Whether the paper or format suits the room |
Sales by drink also feed your costing. If you count stock regularly, you can compare what each drink should use with what the bottles show; the bar inventory software and scales guide explains the counting options. If you plan to offer drinks for delivery, read how delivery apps charge restaurants first, and check your state’s rules on alcohol delivery.
Takeaway: Treat the first print as a trial edition and change it after a few weeks of real orders.
Three example structures
The skeletons below show how the steps combine for three kinds of venue. They are examples with assumed section sizes, not a standard; adjust them to your own trial results.
| Venue (example) | Grouping | Sections in order | Notes |
|---|---|---|---|
| Restaurant with a small bar | Style | Classics; House drinks; Low and no alcohol; Beer and wine (pointer to separate list) | Short list; most guests are ordering with food |
| Cocktail-led bar with original drinks | Flavour map | One two-axis map of house drinks; Classics list beside it; Low and no alcohol | Map helps guests choose unfamiliar names |
| Neighbourhood bar with mixed groups | Strength | Lighter; Medium; Stronger; No alcohol | Rank by the alcohol in each drink as made to your own recipe specs; keep style words in the entry, not the heading |
Each structure keeps the same entry pattern from Step 3 and a full low- and no-alcohol section from Step 2. Pick the one closest to your venue as a first draft, then let the Step 5 trial decide what changes. More drinks-side topics sit under beverage service.
Takeaway: Start from the skeleton closest to your venue and let real orders shape the second edition.
When this does not apply
The five steps hold for most bar and restaurant drinks lists; the cases below need extra checks or fall outside this guide.
- Chains with calorie labelling duties. The FDA’s menu labeling requirements apply to restaurants in a chain of 20 or more locations doing business under the same name and offering substantially the same menu items; covered establishments disclose calories for standard menu items on menus and menu boards. Check with the FDA guidance whether and how your drinks list is covered.
- Licensing and alcohol rules. What you may serve, list or promote depends on your state and local licence; this guide gives no legal view on it.
- Event and wedding menus. One-night menus for a fixed group have different constraints; the trial step does not fit them.
- Wine and beer lists. These follow their own conventions (producer, vintage, style); this guide covers cocktails and mixed drinks.
Takeaway: Confirm labelling and licensing rules locally before you print.
How we checked this
We compiled this guide on 7 October 2026 from the International Bartenders Association’s official cocktail list, the W3C’s WCAG 2.2 explanation of contrast, a 2009 Cornell University Center for Hospitality Research report on menu price formats, a 2017 SevenFifty Daily report on bar menu design, and the FDA’s menu labeling page. The five-step build and the example structures are our own way of organising that material; we did not design or test menus for this article and give no recipes. Other restaurant operations articles are on the blog, and About explains who runs this independent site.
Takeaway: Use the steps as a working checklist, and re-check the FDA and WCAG pages for updates before you rely on them.
Related reading
- Bar inventory software, apps and scales — Count the stock behind every drink on the list and keep bottle costs current.
- Restaurant delivery apps: types, fees and how they make money — Check app pricing rules before listing drinks or dishes for delivery.